This document is intended for skinners wanting to make skins for Psychic_313's conversion of the Epic 'War Machine' model.
The first section explains how to make a "normal" skin without using Unrealscript; the process is just like a Male Soldier skin. Section 2 explains how to extend these skins with Unrealscript, and section 3 is for people who want to convert an existing Male Soldier skin without duplicating all the textures, like Psychic_313's skin conversion packs do.
Section 1. Basic War Machine skins
A "normal" War Machine skin is almost exactly like a Male Soldier skin: there are four texture regions (torso, legs, arms, head/hands), with team colours affecting the torso and legs only.
Making the textures
The texture layout is very similar to that of Male Soldier (it was obviously designed with the War Machine skin in mind) - it's fairly safe to just make a Male Soldier skin and use it for the War Machine. There are some important differences, which are noted below.
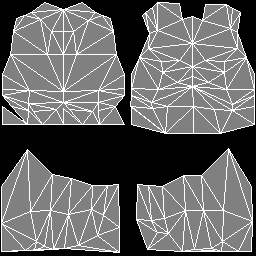
Material 1 (torso, wrists)

The War Machine's shoulders (top right) extend a little further out than the Male Soldier's, and the bottom of the chest and back extends slightly lower, so carry on painting beyond where you'd normally stop.
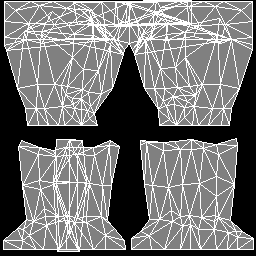
Material 2 (legs, boots)

The War Machine's lower legs (bottom half) extend further up than the Male Soldier's, so again, keep painting a bit beyond where you'd normally stop.
The fins on the War Machine's back use the same texture as one of the Male Soldier's boots (bottom left).
The decoration around the War Machine's shoulders comes from the belt (top).
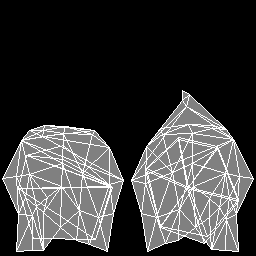
Material 3 (arms)

The inside of the groin/leg joint on the War Machine uses the same texture as part of the upper arm (bottom half).
The Male Soldier's shoulder pads (top half) are not used anywhere.
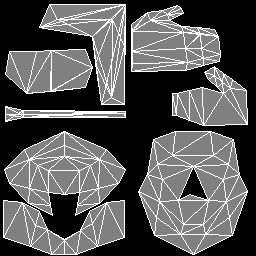
Material 4 (head, back aerial, hands, soles of feet)

The L-shaped body of the Male Soldier's communicator (top left) is used for the spikes extending back from the War Machine's head.
The microphone part of the Male Soldier's communicator (middle left) is used for the 'aerial' on the War Machine's back.
The arrowhead-shape in the middle of the face is not mapped to anything; the triangle immediately below it is stretched upwards to fill the gap. The mesh does not have a nose, so any skin where the nose is represented on that triangle will look weird.
UT Skinmaker
A UT Skinmaker 2.4.1 plugin for this model is available from Fileplanet, courtesy of Lawgiver at Identity Crisis. Later UTSM versions (after, and not including, version 2.5beta5) are likely to include this model as part of the normal custom models pack.
Naming the textures
As usual for Male Soldier skins, pick any 4-letter code to name your skin. Please don't use a code starting with P3, as I (Psychic_313) intend to use these for any skins I convert. Incorporating your alias or nickname into your skin name might be a good way to keep it unique.
For these instructions, I'll assume your skin code is "wxyz".
You also need to choose a package name (UTX file name). This must always start with "PS2WarMachineSkins_". The bit after the underscore is up to you - I suggest using your 4-letter code, so the package name is something like "PS2WarMachineSkins_wxyz".
The texture names are just like Male Soldier skins, except that, where you'd normally put "5" in the talktexture names, you put "C" instead.
So, a skin contains:
- wxyz1: torso (non-team), 256x256 pixels
- wxyz1t_0 to wxyz1t_3: torso (0 = Red Team, 1 = Blue Team, 2 = Green Team, 3 = Gold Team), 256x256 pixels
- wxyz2: legs (non-team), 256x256 pixels
- wxyz2t_0 to wxyzt_3: legs (team versions), 256x256 pixels
- wxyz3: arms, 256x256 pixels
- wxyz4whatever: any number of faces, 256x256 pixels (replace "whatever" with an identifier for the face)
- wxyzCwhatever: talktextures, 64x64 pixels (one to match each face)
Your textures must be 256-colour (8-bit) BMP or PCX files.
For best results, I recommend saving your textures from your paint program as 24-bit (16 million colour, RGB) BMP files, then using the excellent utility Bright (by Epic Games' Eric de Neve) to convert these to 256-colour PCX files. Bright is slow (a few seconds per file) but it's worth using it, as its colour reduction is extremely good quality, better than Paintshop Pro or Photoshop. You can get it from Polycount's UT resources page. If you do this, be careful to import only the PCX files! (24-bit images either crash UnrealEd or look random)
Importing with UnrealEd
This is just like any other skin. Run UnrealEd and open up the Texture Browser (it's the little picture of a landscape on the top toolbar). Choose File/Import, change the filter to "All Files (*.*)" if you used BMP files, and browse to the folder you saved the BMPs or PCXs to. In the Import dialog, select all of them using Shift+click and Ctrl+click, and press OK.
You will now get another dialog. Change Package to the skin package name
you decided on (for example, PS2WarMachineSkins_wxyz) and change the Group to
"Skins". Leave Name as it is - UnrealEd generates this from the
filename - and untick Masked. If the texture currently being imported is a
talktexture, untick "Generate Mipmaps", otherwise tick it. Click OK and
repeat for all the textures (you should just need to change the Generate
Mipmaps setting occasionally).
You should now see all your new textures. Right-click on one of them and
select Properties. Go to Quality, change the LODSet property
to LODSET_Skin for normal textures or LODSET_None for
talktextures, and click OK. Repeat for all your textures. Yes, it's boring,
sorry.
Finally, go to File/Save As... and save it in your
UnrealTournament\Textures folder (not the Textures subfolder of your project)
using the skin package name plus ".utx" as the filename (UnrealEd will usually
fill this in automatically) - for example, PS2WarMachineSkins_wxyz.utx.
The INT file for each skin needs to be named after the UTX file and contain this:
[public]
Object=(Name=(skin package name).(4-letter code)1,Class=Texture,Description="(human-readable name)")
Object=(Name=(skin package name).(4-letter code)4(face name),Class=Texture,Description="(human-readable name of face)")
If a skin has more than one face, add extra face lines; if a package contains more than one skin, add extra skin and face names.
For example, this is a valid INT file:
[public]
Object=(Name=PS2WarMachineSkins_wxyz.wxyz1,Class=Texture,Description="Weird Xenophobic Yellow Zebra")
Object=(Name=PS2WarMachineSkins_wxyz.wxyz4Default,Class=Texture,Description="Zebra")
Object=(Name=PS2WarMachineSkins_wxyz.wxyz4Freak,Class=Texture,Description="Mutant Freak")
Section 2. UnrealScripted skins
To go beyond what normal skins allow, you can incorporate Unrealscript into War Machine skins. This is a feature of Advanced Model Support, which the War Machine is based on.
A basic Unrealscripted skin
To do this, make textures for a skin as usual, but don't import it using UnrealEd.
Create a new folder just inside your Unreal Tournament folder. It should have the same name as the package you want to create, with no extension (for example, C:\UnrealTournament\PS2WarMachineSkins_wxyz). Place all your source textures in this folder, then create a subfolder called Classes (e.g. C:\UnrealTournament\PS2WarMachineSkins_wxyz\Classes).
Now you need an import script for your model, which you can write with a text editor like Notepad. Here's a template one:
class PS2WarMachineSkins_wxyz_wxyz extends PS2WarMachineSkinInfo;

//torso
#exec TEXTURE IMPORT NAME=wxyz1 FILE=wxyz1.pcx LODSET=1
#exec TEXTURE IMPORT NAME=wxyz1t_0 FILE=wxyz1t_0.pcx LODSET=1
#exec TEXTURE IMPORT NAME=wxyz1t_1 FILE=wxyz1t_1.pcx LODSET=1
#exec TEXTURE IMPORT NAME=wxyz1t_2 FILE=wxyz1t_2.pcx LODSET=1
#exec TEXTURE IMPORT NAME=wxyz1t_3 FILE=wxyz1t_3.pcx LODSET=1

//legs
#exec TEXTURE IMPORT NAME=wxyz2 FILE=wxyz2.pcx LODSET=1
#exec TEXTURE IMPORT NAME=wxyz2t_0 FILE=wxyz2t_0.pcx LODSET=1
#exec TEXTURE IMPORT NAME=wxyz2t_1 FILE=wxyz2t_1.pcx LODSET=1
#exec TEXTURE IMPORT NAME=wxyz2t_2 FILE=wxyz2t_2.pcx LODSET=1
#exec TEXTURE IMPORT NAME=wxyz2t_3 FILE=wxyz2t_3.pcx LODSET=1

// arms
#exec TEXTURE IMPORT NAME=wxyz3 FILE=wxyz3.pcx LODSET=1

// faces (add similar pairs of lines if there's more than one; replace
//        'whatever' with the face identifier)
#exec TEXTURE IMPORT NAME=wxyz4whatever FILE=wxyz4whatever.pcx LODSET=1
#exec TEXTURE IMPORT NAME=wxyzCwhatever FILE=wxyzCwhatever.pcx LODSET=2 MIPS=OFF

defaultproperties
{
}
The word between "class" and "extends" on the first line must be your package name, followed by "_", followed by your 4-letter code (so if your package is called PS2WarMachineSkins_AlphaOmega and your 4-letter code is AlOm, the word after "class" must be PS2WarMachine_AlphaOmega_AlOm).
Adapt the "#exec" lines to suit your skin (replace all the wxyz's with your skin's 4-letter code, and duplicate and adapt the two face lines if necessary).
Finally, save the script in the Classes folder you just created. The filename must be the name from the first line (the word after Class), followed by ".uc".
Right, now to compile it. Open System\UnrealTournament.ini in Notepad and
find the section headed "[Editor.EditorEngine]". Scroll down a bit
until you see a list of EditPackages. Add these to the end, in this order:
EditPackages=AdvancedModelSupport

EditPackages=PS2WarMachine

EditPackages=PS2WarMachineSkins_wxyz
Change the last line to match your package name.
If this isn't the first time you've compiled the package, delete the output file (System\PS2WarMachineSkins_wxyz.u or whatever). The UnrealScript compiler won't recompile packages which already exist.
Now go to a DOS prompt and do the following:
C:\Windows>x:
X:\>cd "\games\unrealtournament"
X:\Games\UnrealTournament>cd system
X:\Games\UnrealTournament\System>ucc make
Replace x with the drive you installed UT on and
\games\unrealtournament
with the path to your UT folder.
The UCC compiler actually outputs your skin package as a U file in the System folder! It is perfectly safe to leave it there and make an INT file for it as usual, as if it was a UTX (the formats are identical).
Now what?
Now you know how to make a basic Unrealscripted skin, you can start changing things. Here are some of the things you can do - after changing anything, you need to delete the old skin U file and recompile to see your changes.
Team-coloured arms
After the line "defaultproperties" in your import script, add a new line "ChangesWithTeam(2)=1" between the curly brackets, like this:
...
defaultproperties
{
ChangesWithTeam(2)=1
}
Now make some more textures and add some extra "#exec" lines to import them. The texture names need to be wxyz3t_0 to wxyz3t_3.
Team-coloured faces
After the line "defaultproperties" in your import script, add a new line "ChangesWithTeam(3)=1" between the curly brackets, like this:
...
defaultproperties
{
ChangesWithTeam(3)=1
}
Now make some more textures and add some extra "#exec" lines to import them. Each face needs texture names wxyz4t_0whatever to wxyz4t_3whatever, replacing "whatever" with the face name.
You'll probably want team-coloured talktextures too if you do this. Each face's talktextures need texture names wxyzCt_0whatever to wxyzCt_3whatever, again replacing "whatever" with the face name.
Team-coloured arms and faces
If you've enabled team-coloured arms too, there should be two lines between the curly brackets like this:
...
defaultproperties
{
ChangesWithTeam(2)=1
ChangesWithTeam(3)=1
}
Section 3. Converting skins
It's possible to make "parasite" War Machine skins which take all their textures from a corresponding Male Soldier skin. To work properly, these skins require that the right Male Soldier skin is present.
This isn't a standard Advanced Model Support feature - you can do this for any AMS model, but for most models it'll involve more code (I added the code into War Machine so I wouldn't have to include it separately in each skin).
Simple Male Soldier skins
You can convert a simple Male Soldier skin quite easily. Just write a skin script and INT file as described above, but don't make any textures (except some new talktextures). Instead, add two lines to the defaultproperties - "ThisSkinName=" followed by a double quote mark, your skin package, a dot (period, full stop), your 4-letter code and another double quote, and "SoldierSkinName=" followed by the same thing for the Soldier skin you're stealing. For example, here's my conversion of Krow's Mettallian:
class PS2WarMachineSkins_P3km_P3km extends PS2WarMachineSkinInfo;

// PS2 War Machine version of the Mettallian skin by Rick 'Krow' Stirling
// Converted by Simon 'Psychic_313' McVittie with the author's permission

#exec TEXTURE IMPORT NAME=P3kmCkrow FILE=P3kmCkrow.pcx LODSET=2 MIPS=OFF
#exec TEXTURE IMPORT NAME=P3kmCmettallian FILE=P3kmCmettallian.pcx LODSET=2 MIPS=OFF

defaultproperties
{
	ThisSkinName="PS2WarMachineSkins_P3km.P3km"
	SoldierSkinName="SoldierSkins_krowmet.mett"
}
If some textures in the Male Soldier skin have mapping problems on the War Machine (the shoulders are the most common problem area), just import a replacement into the conversion U file, and this will be used instead. For example, if the Red Team torso skin needed replacing, I could have done this:
class PS2WarMachineSkins_P3km_P3km extends PS2WarMachineSkinInfo;

// Replacement torso texture
#exec TEXTURE IMPORT NAME=P3km1t_0 FILE=P3km1t_0.pcx LODSET=1
// Talktextures as before
#exec TEXTURE IMPORT NAME=P3kmCkrow FILE=P3kmCkrow.pcx LODSET=2 MIPS=OFF
#exec TEXTURE IMPORT NAME=P3kmCmettallian FILE=P3kmCmettallian.pcx LODSET=2 MIPS=OFF

defaultproperties
{
	ThisSkinName="PS2WarMachineSkins_P3km.P3km"
	SoldierSkinName="SoldierSkins_krowmet.mett"
}
More complex conversions (Unrealscript coders only)
If you need to hack things, there's a LoadSkin function which controls converting texture names to actual textures. You can override this if you need to play with the skin loading.
For example, some of my converted skins have team-coloured faces with unusual names. I rebuilt LoadSkin to convert AMS face names into the original skin's names, like this:
class PS2WarMachineSkins_P3dv_P3dv extends PS2WarMachineSkinInfo;

// PS2 War Machine version of the Dark Vortex skin by David 'Mirage' Kamerman
// Converted by Simon 'Psychic_313' McVittie with the author's permission
// Code copyright (C) 2001 Simon McVittie

#exec TEXTURE IMPORT NAME=P3dvCf1 FILE=P3dvCf1.pcx LODSET=2 MIPS=OFF
#exec TEXTURE IMPORT NAME=P3dvCf2 FILE=P3dvCf2.pcx LODSET=2 MIPS=OFF

static function Texture LoadSkin(String SkinName, optional bool bNoWarning)
{
	local String Face,Team;
	if( Left(SkinName,Len(default.ThisSkinName)+3) ~= (default.ThisSkinName$"4t_") )
	{
		// we have a team-coloured face... try loading it
		Team = Mid(SkinName,Len(default.ThisSkinName)+3,1);
		Face = Mid(SkinName,Len(default.ThisSkinName)+4,255);

		if(Face~="f3" || Face~="f4")
			return Super.LoadSkin(default.SoldierSkinName$"4"$Face,bNoWarning);
			// these ones don't actually have TCs

		// otherwise translate it to a suffix
		switch(Team)
		{
		case "0": Team = "r"; break;
		case "1": Team = "b"; break;
		case "2": Team = "g"; break;
		case "3": Team = "y"; break;
		default: Team = "";
		}
		return Super.LoadSkin(default.SoldierSkinName$"4"$Face$Team,bNoWarning);
	}
	return Super.LoadSkin(SkinName,bNoWarning);
}

defaultproperties
{
    ChangesWithTeam(3)=1
	ThisSkinName="PS2WarMachineSkins_P3dv.P3dv"
	SoldierSkinName="SoldierSkins_Vortex.dark"
}