This document is extremely out of date. See Securing a wireless network point with Debian and IPSec or Linux 2.6-style native IPSec on Debian GNU/Linux for something slightly less ancient.
I used to access the Cambridge University network with a laptop, via a Linksys wireless access point/router/switch; this document explains how I secured it using free software running on old hardware.
The built-in WEP encryption scheme in 802.11b networking equipment is known to be flawed — it is possible to obtain the key for a WEP link via an entirely passive attack relying only on collecting enough packets. Since I'd get blamed (and possibly disconnected) for any unauthorised use of my connection, I decided to implement something more secure.
Old configuration
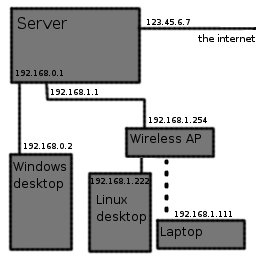
Prior to setting up secure access, my network consisted of:
- an old Pentium III-450 desktop with Debian GNU/Linux 3.0 (now acting as a server and firewall) with one Ethernet card plugged into the college network point, and a second Ethernet card connected to the wireless access point;
- The wireless access point, with wireless connections temporarily disabled, acting as a simple switch (I don't use its router functionality, so all internal machines were connected to its ‘LAN’ ports and the ‘WAN’ port wasn't connected to anything);
- an Athlon-based desktop dual-booting Windows 98 and Debian GNU/Linux unstable, connected to the access point;
- an Apple Powerbook dual-booting Debian GNU/Linux unstable and Mac OS 10.2, connected to the access point.
Yes, I know I have an unreasonable number of computers :-)
My ‘server’ machine has a fairly standard NAT router configuration roughly equivalent to Windows' Internet Connection Sharing, but with the addition of firewalling: it provides NAT routing and a DNS forwarding service to the internal network, and blocks undesirable ports like NetBIOS.
New configuration
I wanted to be able to use my network connection from my laptop, at least from within Debian, via a wireless connection. At the same time, there should do enough authentication and encryption that nobody else can feasibly use the connection (or see what's being transmitted) unless they physically plug in a cable.
However, Windows 98 doesn't do network security without third-party software, so I wanted to be able to connect my Athlon without any extra security measures, without reducing security elsewhere.
The configuration I settled on was to fit an extra network card in my ‘server’, so it has three interfaces — one connects to the outside world, one connects to the wireless access point, and one connects to a trusted computer (my desktop, or occasionally my laptop) via a crossover cable. The policy I use is fairly simple, in theory – connections from the access point to the outside world are allowed if they're using a secured connection, and connections from the ‘trusted’ crossover cable to the outside world are always allowed.
For the purposes of configuration files in this article I'll pretend my IP addresses were 123.45.6.7 (external), 192.168.0.x (trusted link) and 192.168.1.x (wireless), with the server as 192.168.0.1 and 192.168.1.1. (Addresses have been changed to protect the innocent :-)
For the ‘secured connection’ I chose to use IPSec, the emerging industry-standard protocol for transparent network encryption and authentication (the major alternative is Microsoft's PPTP, which is widely implemented but not considered secure). On Linux systems this is usually provided by the FreeS/WAN package. The connection policy is implemented using the standard Linux 2.4 kernel-level firewall, iptables.
Compiling FreeS/WAN
For testing purposes, I did the initial setup between my two unstable machines, which both have the latest versions of just about everything. However, my ‘server’ runs the Debian 3.0 stable release, which is wonderfully stable but a little out of date; it already has a few packages I updated by recompiling the version provided in unstable, so I decided to do the same with FreeS/WAN.
In order to make the unstable version compile, I had to add some other packages from unstable, namely intltool-debian, po-debconf and debhelper (possibly others, but those are the ones I found while browsing through aptitude afterwards); I also had to loosen some dependencies in the debian/control file.
[TODO: recompile an up-to-date freeswan package and document exactly what I did. Ideally, compile it in a pure stable environment, like a fresh User-Mode Linux box. (That requires getting UML working again though)]
I do kernel compilation for the ‘server’ on my faster desktop, since dependencies aren't a problem for the standalone kernel; I simply added the freeswan modules package (TODO: check exact names) and used kernel-package to build a set of nice .deb files containing the kernel and modules. Unfortunately, recent Debian kernel source packages, as well as bug fixes, have included a backport of the Linux 2.6 IPSec code; this isn't entirely compatible with FreeS/WAN, so I had to apply a patch by the Debian kernel maintainer to adapt the FreeS/WAN modules. In the last compile I did for my laptop, I reversed the Debian IPSec patch to remove the IPSec stuff from the kernel source tree, while keeping the Debian bugfixes; this is probably a nicer solution, but does require recompiling the kernel.
Configuring FreeS/WAN
Once all the packages were installed, I re-read the FreeS/WAN documentation a few times, then proceeded with configuration. Here are (roughly) the steps I followed (or rather, the steps I would have followed if I got it right first time :-).
Host keys
On each host, stop the IPSec daemons, and generate a key (as root):
/etc/init.d/ipsec stop
ipsec newhostkey --output /etc/ipsec.secrets
ipsec showhostkey --left
Note down the long strings generated by showhostkey: these are the machines' public keys. You'll need to copy and paste these to the configuration files.
The server's configuration file
FreeS/WAN calls the ends of a connection “left” and “right”; I use the convention that the computer whose configuration I'm editing is always on the left (mnemonic: left is local, right is remote).
The usual configuration is for connections through the IPSec gateway to be encrypted, but not connections to the gateway. I want everything encrypted, so for each client, I have to add two connections: one from the client to the Internet, and one from the client to the server itself.
Keys specified here are placeholders; replace with the public host keys generated above.
version 2.0

# basic configuration
config setup
    # eth0 is internal (192.168.0.1)
    # eth1 is wireless (192.168.1.1)
    # eth2 is external (123.45.6.7)
    # I associated the similarly-numbered ipsec interface with each.
    interfaces="ipsec0=eth0 ipsec1=eth1 ipsec2=eth2"
    # Debug-logging controls:  "none" for (almost) none, "all" for lots.
    klipsdebug=none
    plutodebug=none

# defaults for all connections
conn %default
    # authenticate by RSA public-key crypto
    authby=rsasig
    keyingtries=1
    disablearrivalcheck=no
    pfs=yes
    # left RSA sig key is this host's public key
    leftrsasigkey=SERVERHOSTPUBLICKEY
    # a domain-like string for this host; make up a domain if you don't have one
    leftid=@server.mydomain.private
    # on starting IPSec, prepare the connection but don't bring it up
    # (we let the clients do that)
    auto=add

# These are a matching pair. The first is from the laptop to the server;
# the second is from the laptop to the Internet.
conn laptop-wifi
    # server's IP on the wireless link
    left=192.168.1.1
    # laptop's IP
    right=192.168.1.111
    # laptop's ID and key
    rightid=@laptop.mydomain.private
    rightrsasigkey=LAPTOPHOSTPUBLICKEY
conn laptop-wifi-internet
    # same IP, but this time we're prepared to route to the entire Internet
    left=192.168.1.1
    leftsubnet=0.0.0.0/0
    # laptop's IP
    right=192.168.1.111
    # laptop's ID and key
    rightid=@laptop.mydomain.private
    rightrsasigkey=LAPTOPHOSTPUBLICKEY

# Another client
conn desktop-wifi
    left=192.168.1.1
    right=192.168.1.222
    rightid=@desktop.mydomain.private
    rightrsasigkey=DESKTOPHOSTPUBLICKEY
conn desktop-wifi-internet
    left=192.168.1.1
    leftsubnet=0.0.0.0/0
    right=192.168.1.222
    rightid=@laptop.mydomain.private
    rightrsasigkey=DESKTOPHOSTPUBLICKEY

# I don't have opportunistic encryption, which causes extra DNS lookups,
# so I disable it.
conn block
    auto=ignore
conn private
    auto=ignore
conn private-or-clear
    auto=ignore
conn clear-or-private
    auto=ignore
conn clear
    auto=ignore
conn packetdefault
    auto=ignore
The clients
The client configuration is more streamlined. This one's for the laptop; the desktop can use a similar configuration.
version 2.0

config setup
    # this means ipsec0= followed by whatever interface is our default route
    # (that's often a suitable configuration)
    interfaces="%defaultroute"
    # Debug-logging controls:  "none" for (almost) none, "all" for lots.
    klipsdebug=none
    plutodebug=none

conn %default
    authby=rsasig
    leftrsasigkey=LAPTOPHOSTPUBLICKEY
    keyingtries=1
    disablearrivalcheck=no
    pfs=yes
    leftid=@laptop.mydomain.private
    # this time, as soon as IPSec comes up we want to connect to the server
    auto=start

# these are like the server ones, but with roles reversed
conn wifi
    # laptop's IP
    left=192.168.1.111
    # server's IP on the wireless link
    right=192.168.1.1
    # server's ID and key
    rightid=@server.mydomain.private
    rightrsasigkey=SERVERHOSTPUBLICKEY
conn wifi-internet
    # laptop's IP
    left=192.168.1.111
    # server IP, but this time it's prepared to route to the entire Internet
    right=192.168.1.1
    rightsubnet=0.0.0.0/0
    # server's ID and key
    rightid=@server.mydomain.private
    rightrsasigkey=SERVERHOSTPUBLICKEY

# I don't have opportunistic encryption, which causes extra DNS lookups,
# so I disable it.
conn block
    auto=ignore
conn private
    auto=ignore
conn private-or-clear
    auto=ignore
conn clear-or-private
    auto=ignore
conn clear
    auto=ignore
conn packetdefault
    auto=ignore
Starting and stopping FreeS/WAN
On a host where the network configuration is stable, you can arrange for FreeS/WAN to start during the boot process, preferably just after your network interfaces go up. If you're messing with the interfaces, you should stop FreeS/WAN (/etc/init.d/ipsec stop) before making changes to which interfaces are up, and start it (/etc/init.d/ipsec start) afterwards; it gets confused if your interfaces change.
In Debian you can automate this by adding “pre-up /etc/init.d/ipsec stop || true” and “up /etc/init.d/ipsec start || true”, and the corresponding commands for the “down” action, to each interface's description in /etc/network/interfaces; ifup and ifdown will then run the appropriate actions. This isn't ideal if you have many network cards.
On a host with odd networking (like my laptop, with both wired and wireless networking) Debian's ifupdown isn't really very suitable. I've written a shell script to handle my network configuration, including IPSec, which I might publish eventually.
Firewalling
Setting up FreeS/WAN is the difficult half of the process, but I still needed to configure a firewall to stop non-secured connections getting out. There is an additional snag; IPSec doesn't work well with the Linux kernel's address spoofing protection, so it automatically switches that feature off. As a result, the firewall needed to catch “impossible” addresses which the kernel would normally handle elsewhere.
Many iptables users have lengthy shell scripts to add rules; instead, I use the accompanying program iptables-restore(8) to load a complete ruleset from a file. This is a reduced version of the ruleset I actually use, loaded with:
iptables-restore < ruleset-file
In its current configuration, this ruleset is not particularly paranoid; in particular, input (to the server) is allowed unless specified otherwise, all output from the server is allowed (i.e. you trust your server not to get subverted), and no filtering is done on forwarded packets.
Another quirk is that 10.x.x.x, one of the reserved “private use” netblocks, is considered to be a valid address range for the Internet in general; this is because some ISPs use it for their infrastructure, particularly things that don't need a public address like internal routers and DHCP servers.
# Empty the default table (filter)
*filter

# Clear the basic chains and set default policies
:INPUT ACCEPT [0:0]
:FORWARD DROP [0:0]
:OUTPUT ACCEPT [0:0]

# Create some chains to filter input...
:INtcp - [0:0]
:INudp - [0:0]
:INprivate - [0:0]
:INinternal - [0:0]
:INnonetbios - [0:0]
:INdropspoof - [0:0]
# and output...
:OUTdropwrong - [0:0]
# and to do stuff with bad packets.
:block - [0:0]
:droplog - [0:0]
:dropbcast - [0:0]
:reject - [0:0]

# Input-related chains ================================================

# Accept anything locally-generated
-A INPUT -i lo -j ACCEPT
# Drop spoofed traffic
-A INPUT -j INdropspoof
# Filter UDP and TCP separately, for speed
-A INPUT -p tcp -j INtcp
-A INPUT -p udp -j INudp
# On untrusted interfaces, drop NetBIOS (a.k.a. SMB or Windows Networking)
-A INPUT -i eth1 -j INnonetbios
-A INPUT -i eth2 -j INnonetbios
# (For a default-drop firewall, you'd need to add rules here to allow in ICMP
# and established connections)

# TCP port blocks
# Port 31337 is blocked unconditionally and silently. This is just an example
-A INtcp -p tcp -m tcp --dport 31337 -j REJECT --reject-with tcp-reset
# The DNS server is considered private (trusted or encrypted connection only)
-A INtcp -p tcp -m tcp --dport 53 -j INprivate
# RPC (portmap) is blocked but also logged
-A INtcp -p tcp -m tcp --dport 111 -j block
# ssh is internal (private, + allowed on wireless LAN)
-A INtcp -p tcp -m tcp --dport 22 -j INinternal

# UDP port blocks, similar to the TCP ones
-A INudp -p udp -m udp --dport 53 -j INprivate
-A INudp -p udp -m udp --dport 111 -j block

# Policy for private ports
-A INprivate -i eth0 -j RETURN
-A INprivate -i ipsec+ -j RETURN
-A INprivate -j dropbcast
-A INprivate -j LOG --log-prefix private --log-level warning
-A INprivate -j reject

-A INinternal -i eth2 -j dropbcast
-A INinternal -i eth2 -j LOG --log-prefix internal --log-level warning
-A INinternal -i eth2 -j reject

# Anti-spoofing. Spoofed packets are logged and dropped, no reply.
# Broadcast packets with no IP are acceptable, but only internally.
# (This is necessary to make DHCP work, so it's probably a good thing)
-A INdropspoof --source 0.0.0.0 --dest 255.255.255.255 -j INinternal
# Packets claiming to be from localhost are definitely not good.
-A INdropspoof -i ! lo --source 127.0.0.0/8 -j LOG --log-prefix spoof --log-level warning
-A INdropspoof -i ! lo --source 127.0.0.0/8 -j DROP
# Packets with the right addresses are acceptable.
-A INdropspoof -i eth0 --source 192.168.0.0/24 -j RETURN
-A INdropspoof -i ipsec0 --source 192.168.0.0/24 -j RETURN
-A INdropspoof -i eth1 --source 192.168.1.0/24 -j RETURN
-A INdropspoof -i ipsec1 --source 192.168.1.0/24 -j RETURN
# Any private address except those above is unacceptable.
-A INdropspoof --source 172.16.0.0/12 -j LOG --log-prefix spoof --log-level warning
-A INdropspoof --source 172.16.0.0/12 -j DROP
-A INdropspoof --source 192.168.0.0/24 -j LOG --log-prefix spoof --log-level warning
-A INdropspoof --source 192.168.0.0/24 -j DROP
# Anyone in the world is allowed to connect to the external interface.
-A INdropspoof -i eth2 -j RETURN
-A INdropspoof -i ipsec2 -j RETURN
# If you get here, it means someone on the inside is pretending to be on the
# outside.
-A INdropspoof -j LOG --log-prefix spoof --log-level warning
-A INdropspoof -j DROP

# Cheap NetBIOS filter. Warning: may have collateral damage
# (some of ports 135-139 aren't actually NetBIOS).
-A INnonetbios -p tcp -m tcp --dport 135:139 -j block
-A INnonetbios -p udp -m udp --dport 135:139 -j block
-A INnonetbios -p tcp -m tcp --dport 445 -j block
-A INnonetbios -p udp -m udp --dport 445 -j block

# Output-related chains ====================================================

# Output: we accept anything correctly routed.
-A OUTPUT -o lo -j ACCEPT
-A OUTPUT -j OUTdropwrong

# Output: drop packets going to the wrong places.
-A OUTdropwrong -o ! lo --dest 127.0.0.0/8 -j LOG --log-prefix spoof --log-level warning
-A OUTdropwrong -o ! lo --dest 127.0.0.0/8 -j DROP
-A OUTdropwrong -o eth0 --dest 192.168.0.0/24 -j RETURN
-A OUTdropwrong -o eth1 --dest 192.168.1.0/24 -j RETURN
-A OUTdropwrong -o ipsec0 --dest 192.168.0.0/24 -j RETURN
-A OUTdropwrong -o ipsec1 --dest 192.168.1.0/24 -j RETURN
-A OUTdropwrong --destination 172.16.0.0/12 -j LOG --log-prefix badroute --log-level notice
-A OUTdropwrong --destination 172.16.0.0/12 -j DROP
-A OUTdropwrong --destination 192.168.0.0/24 -j LOG --log-prefix badroute --log-level notice
-A OUTdropwrong --destination 192.168.0.0/24 -j DROP
-A OUTdropwrong -o eth2 -j RETURN
-A OUTdropwrong -o ipsec2 -j RETURN
-A OUTdropwrong -j LOG --log-prefix sillyroute --log-level notice
-A OUTdropwrong -j DROP

# Forwarding ================================================================

# Drop faked packets
-A FORWARD -j INdropspoof
-A FORWARD -j OUTdropwrong
# Drop broadcast noise (although we shouldn't be forwarding it anyway)
-A FORWARD -j dropbcast
# Drop any NetBIOS chatter between subnets
-A FORWARD -i eth1 -j INnonetbios
-A FORWARD -o eth1 -j INnonetbios
-A FORWARD -i eth2 -j INnonetbios
-A FORWARD -o eth2 -j INnonetbios
# eth0 and ipsec+ are trusted to connect anywhere, and get replies.
-A FORWARD -i eth0 -j ACCEPT
-A FORWARD -o eth0 -m state --state ESTABLISHED,RELATED -j ACCEPT
-A FORWARD -i ipsec+ -j ACCEPT
-A FORWARD -o ipsec+ -m state --state ESTABLISHED,RELATED -j ACCEPT
# Otherwise, connection denied.
-A FORWARD -j LOG --log-prefix badfwd --log-level warning
-A FORWARD -j REJECT --reject-with icmp-net-unreachable

# Utility chains ===========================================================

# droplog: a slightly enhanced DROP target. Logs packet and drops it, no reply
-A droplog -j LOG --log-prefix drop --log-level warning
-A droplog -j DROP

# block: a slightly enhanced REJECT target.
# Everything except broadcasts gets logged and rejected with an error response.
# Broadcasts just disappear silently.
-A block -j dropbcast
-A block -j LOG --log-prefix block --log-level warning
-A block -j reject

# Don't log things that look like a broadcast, they're usually just noise.
-A dropbcast --source 0.0.0.255/0.0.0.255 -j DROP
-A dropbcast --destination 0.0.0.255/0.0.0.255 -j DROP

# reject: rejects packets in a way that looks like a closed port
# (so portscans can't tell whether you're running a firewall, or just not
# running any servers)
-A reject -p tcp -j REJECT --reject-with tcp-reset
-A reject -j REJECT --reject-with icmp-port-unreachable

COMMIT

# Get the NAT stuff working.
# If your external IP is dynamic, use -j MASQUERADE instead.

*nat
:PREROUTING ACCEPT [0:0]
:POSTROUTING ACCEPT [0:0]
:OUTPUT ACCEPT [0:0]
-A POSTROUTING -o eth2 -j SNAT --to-source 123.45.6.7
COMMIT